
RefluxUser Guide
Overview
Reflux is a framework for creating simple FWT desktop applications.
Modelled after an internet browser, Reflux lets you explore and edit resources via URIs. It expands upon Fantom's FWT by adding:
- An IoC container - Reflux applications are IoC applications.
- Events - An application wide eventing mechanism.
- Customisation - All aspects of a Reflux application may be customised.
- Context sensitive commands - Global commands may be enabled / disabled.
- Browser session - A consistent means to store session data.
- New FWT widgets - Fancy tabs, trees and a working web browser.
Reflux was inspired by Fantom's core flux library.
Flux -> Reloaded -> Reflux
Quick Start
- Create a text file called
Example.fanand copy this Example Reflux Code - Run
Example.fanas a Fantom script from the command line:C:\> fan Example.fan [afIoc] Adding module definition for afReflux::RefluxModule [afIoc] Adding module definition for ExampleView_0::AppModule ___ __ _____ _ / _ | / /_____ _____ / ___/__ ___/ /_________ __ __ / _ | / // / -_|/ _ /===/ __// _ \/ _/ __/ _ / __|/ // / /_/ |_|/_//_/\__|/_//_/ /_/ \_,_/__/\__/____/_/ \_, / Alien-Factory IoC v2.0.8 /___/ IoC Registry built in 216ms and started up in 10ms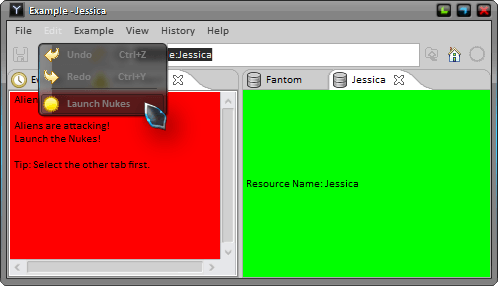
Usage
Reflux takes the internet browser strategy of labelling everything with a URI. Be it a file, an internet resource, or a database entity - if it can be identified by a URI then it may presented and edited in Reflux.
A Reflux application is made up of:
- Menu bar
- Tool bar
- Global commands
- Panels
- Views
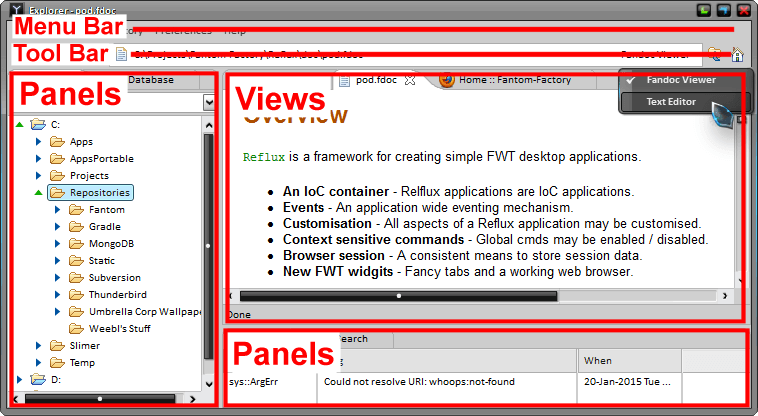
URIs are typed into the address bar. The typed URI is then resolved to a Resource. Resource objects hold meta data that describe how it should be displayed / interacted with. Views are used to view and / or edit resources. Panels are extra tabs that show arbitrary data.
The menu and tool bars are customisable via IoC contributions. Global commands wrap standard FWT commands to make them context sensitive; for example, the Save global command is only enabled when the current view is dirty.
Note that Reflux itself is just a toolkit. See the Alien-Factory Explorer application for a concrete example of Reflux use.
Explorer
Alien-Factory Explorer is a sample Reflux application that contains, amoungst other things, a file explorer and fandoc editor.
Install Explorer with fanr:
C:\> fanr install -r http://repo.status302.com/fanr/ afExplorer
Start the Explorer application from the command line:
C:\> fan afExplorer
IoC Container
Reflux is an IoC container. That is, it creates and looks after a Registry instance, using it to create classes and provide access to services.
In a Reflux application all processing happens in the UI thread. As such, Reflux defines a single threaded scope called uiThread and all services are created from this. This means all your services can be non-const, and you don't have to even think about scopes.
Happy days!
Panels
Panels are widget panes that decorate the edges of the main window. Only one instance of each panel type may exist. They are typically created at application startup and live until the application shuts down.
To create a custom panel, first create a class that extends Panel. Panels must set the content field in order to display anything. This example just sets its FWT content to a yellow label:
class MyPanel : Panel {
    new make(|This| in) : super(in) {
        content = Label() {
            it.text = "Hello Mum!"
            it.bg   = Color.yellow
        }
    }
}
Note that the Panel's ctor must take an it-block parameter and pass it up to the superclass to be executed. This is so IoC can inject all those lovely dependencies. Now contribute an instance of the panel to the Panels service in your AppModule:
class AppModule {
    @Contribute { serviceType=Panels# }
    Void contributePanels(Configuration config) {
        myPanel := config.build(MyPanel#)
        config.add(myPanel)
    }
}
Panels need to be autobuilt so IoC injects all the dependencies (via that it-block ctor parameter).
Panels are automatically added to the View -> Panels menu. If the panel does not set a name it defaults the Panel's type, minus any Panel suffix. When displayed, our simple panel should look like:

Note that Panels are not displayed by default; but the user's display settings are saved from one session to the next. To force the user to always start with the panel displayed, show it programmatically on application startup:
RefluxBuilder(AppModule#).start |Reflux reflux, Window window| {
    reflux.showPanel(MyPanel#)
}
Panels contain several callback methods that are invoked at different times of its lifecycle. These are:
onShow()- called when it's added to the tab pane.onActivate()- called when it becomes the active tab.onModify()- called when panel details are modified, such as the name or icon.onDeactivate()- called when some other tab becomes active.onHide()- called when it is removed from the tab pane.refresh()- called when the panelisShowingand the refresh button is clicked.
Panels are automatically added to the EventHub - see Eventing for details.
Views
Views are Panels that are associated with an (editable) resource. They are displayed in the centre of the Window.
Custom views must extends View, which in turn extends Panel. Like panels, views must set the content field to display anything. This example view just displays the resource name in a green box:
class MyView : View {
    Label label

    new make(|This| in) : super(in) {
        content = label = Label() {
            it.bg = Color.green
        }
    }

    override Void load(Resource resource) {
        super.load(resource)
        label.text = "Resource Name: ${resource.name}"
    }
}
Because a View is associated with a resource, it has a few more callbacks:
load()- called when the view should display a resource.save()- called when the save button is clicked.refresh()- called when the refresh button is clicked.confirmClose()- called when the view is being closed.
Resources decide how they want to be displayed, so to display our view we need to create a concrete Resource implementation...
Resolving URIs
Lets take this simple resource object:
class MyResource : Resource {
    override Uri    uri
    override Str    name
    override Image? icon

    new make(Uri uri) {
        this.uri  = uri
        this.name = uri.name
        this.icon = Image("fan://icons/x16/database.png")
    }

    override Type[] viewTypes() {
        [MyView#]
    }
}
It holds it's name, has a database icon and the viewTypes() method says it should be represented by the MyView class.
Should viewTypes() return more than one type, the user may cycle between them using drop down in the address bar or an F12 shortcut. This useful for toggling between view and edit modes.
It is the job of UriResolvers to convert URI strings, as entered in the address bar, into resource instances. The following URI resolver will convert any URI with the scheme example: into a MyResource object:
class MyResolver : UriResolver {
    @Inject Registry registry

    new make(|This|in) { in(this) }

    override Resource? resolve(Str uri) {
        uri.toUri.scheme == "example"
            ? MyResource(uri.toUri)
            : null
    }
}
To use MyResolver it must be contributed to the UriResolvers service in the AppModule:
@Contribute { serviceType=UriResolvers# }
Void contributeUriResolvers(Configuration config) {
    config["myResolver"] = config.build(MyResolver#)
}
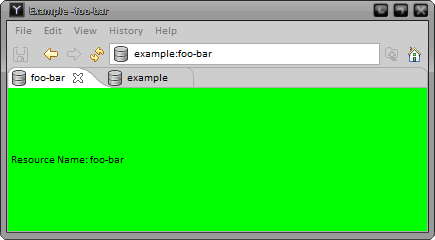
When example:foo-bar is entered into the address bar, the following should happen:
MyResolverresolvesexample:foo-barand builds aMyResourceinstance.MyResourcereturnsMyViewas a view type.MyViewis created and asked to load theMyResource.
And this should be displayed:
Menu Bar
Reflux comes with a pre-configured menu bar which is suitable for most applications. However it may be altered via IoC contributions.
Each main Reflux menu is a standard FWT Menu instance, but is also configured as an IoC service and contributed to afReflux.menuBar. The menus use the following service IDs:
afReflux.fileMenuafReflux.editMenuafReflux.viewMenuafReflux.historyMenuafReflux.prefsMenuafReflux.helpMenu
So, removing the history menu is as simple as:
@Contribute { serviceId="afReflux.menuBar" }
Void contributeMenuBar(Configuration config) {
    config.remove("afReflux.historyMenu")
}
And to add your own menu:
@Contribute { serviceId="afReflux.menuBar" }
Void contributeMenuBar(Configuration config) {
    config["example"] = Menu() { it.text = "Example"}
}
Use IoC ordering constraints to further position the menu:
@Contribute { serviceId="afReflux.menuBar" }
Void contributeMenuBar(Configuration config) {
    menu := Menu() { it.text = "Example"}
    config
        .set("example", menu)
        .after("afReflux.editMenu")
        .before("afReflux.viewMenu")
}
Menu Items
The menus services take contributions of MenuItems, so to add a Hello Mum! command to the edit menu:
@Contribute { serviceId="afReflux.editMenu" }
Void contributeEditMenu(Configuration config) {
    command := Command("Hello Mum!", null) |Event event| { echo("Hello Mum!") }
    config["myCommand"] = MenuItem(command)
}
Note that while a standard FWT command is used above, it is recommended that RefluxCommands are used so any invocation errors are routed to the Errors service for standardised handling. GlobalCommands may also be used.
Use IoC ordering constraints to further position any contributed commands / menu items. For example, to place the Hello Mum! command as the first item:
@Contribute { serviceId="afReflux.editMenu" }
Void contributeEditMenu(Configuration config) {
    command := Command("Hello Mum!", null) |Event event| { echo("Hello Mum!") }
    config
        .set("myCommand", MenuItem(command))
        .before("afReflux.cmdUndo")
}
When ordering menu items commands consult the source code of RefluxModule to find current contribution IDs, such as afReflux.cmdUndo above.
Tool Bar
The tool bar may be configured in much the same way as the menu bar, with IoC contributions. To add fwt Button objects, contribute them to the afReflux.toolBar service:
@Contribute { serviceId="afReflux.toolBar" }
Void contributeEditMenu(Configuration config) {
    command := Command("Hello Mum!", null) |Event event| { echo("Hello Mum!") }
    config["myButton"] = Button(command)
}
To remove or position buttons in the tool bar, consult the RefluxModule source code for current contribution IDs.
Global Commands
Global commands are wrappers around standard fwt commands that may be accessed from the GlobalCommands service. They are generally added to menus and tool bars. For the accelerator (keyboard shortcuts) to work, they need to be added to a menu bar.
Global command instances should be contributed to the GlobalCommands service:
@Contribute { serviceType=GlobalCommands# }
Void contributeGlobalCommands(Configuration config) {
    config["myGlobCmd"] = config.build(MyGlobalCommand#)
}
Global commands are disabled by default. It is up to Views and Panels (or any service) to add enabler functions that dictate when the command should be active. This way, global commands may be decoupled from their context sensitivity. For example, to only enable myGlobCmd when MyPanel is active:
class MyPanel : Panel {
    @Inject GlobalCommands globalCommands

    new make(|This| in) : super(in) { }

    override Void onActivate() {
        globalCommands["myGlobCmd"].addEnabler("myPanel") |->Bool| { true }
    }

    override Void onDeactivate() {
        globalCommands["myGlobCmd"].removeEnabler("myPanel")
    }
}
Other Panels may add their own enabler functions thereby allowing the command to be enabled in multiple situations.
Note that enabler functions are OR'ed together, that is, it only takes one function to return true for the command to be enabled.
Eventing
Reflux eventing allows different parts of the application to communicate with other parts without direct references.
Define
Reflux events are defined by a mixin. The mixin should define virtual (or abstract) methods, these are the events. As such, it is convention that they are named onXXXX():
mixin MyEvents {
    virtual Void onMyEvent(Str stuff) { }

    ...
}
Note that event methods should not return anything (they're strictly fire and forget) and any virtual implementations should do nothing.
For MyEvents to be recognised as an event type it needs to be contributed to the EventTypes service:
@Contribute { serviceType=EventTypes# }
Void contributeEventHub(Configuration config) {
    config.add(MyEvents#)
}
Fire
Reflux creates a instance of the event mixin that can be injected into your components and services. To fire an event, just call the method.
class MyService {
    @Inject MyEvents myEvents

    new make(|This|in) { in(this) }

    Void someHandler() {
        myEvents.onMyEvent("wotever")
    }
}
Handle
Multiple classes may handle events. For a class to so, it must first register itself with the EventHub service. When an event is fired, each registered class is scanned to see if it implements the appropriate event mixin. If it does, the event method is called:
class MyOtherService : MyEvents {

    new make(EventHub eventHub) {
        eventHub.register(this)
    }

    override Void onMyEvent(Str stuff) {
        echo("Got ${stuff}")
    }
}
Event methods may be abstract, but by making them virtual event handler classes are not forced to implement all the event methods.
Because it is common for them to receive events, all instances of Panels, Views and GlobalCommands are automatically added to EventHub by default. Therefore to receive events, all they need to do is implement the event mixin.
Example Code
Following is a basic Reflux app that incorporates ideas and example code shown in previous sections. When learning Reflux, it is suggested that you start here and then look at the source code of the Explorer application.
The sample application contains:
- A panel that captures and lists all the Reflux events fired.
- A URI resolver, a resource and a corresponding green view.
- A new
Examplemenu with items to open up URIs. - A Launch Nukes global command that's added to both the edit menu and the toolbar.
- A red Alien Attack panel that selectively enables the Launch Nukes global command.
As you will see, the Launch Nukes global command is only active when the Alien Attack panel is not displayed.
Things to try:
- Enter
example:Fantom-Factoryinto the address bar. - Enter
whoops:not-foundinto the address bar.
Example.fan
using afIoc
using afReflux
using fwt
using gfx

class Example {
    Void main() {
        RefluxBuilder(AppModule#).start |Reflux reflux, Window window| {
            reflux.showPanel(EventsPanel#)
            reflux.showPanel(AlienAlertPanel#)
            reflux.load("example:Fantom")
        }
    }
}

const class AppModule {
    @Contribute { serviceType=Panels# }
    Void contributePanels(Configuration config) {
        config["events"]     = config.build(EventsPanel#)
        config["alienAlert"] = config.build(AlienAlertPanel#)
    }

    @Contribute { serviceType=UriResolvers# }
    Void contributeUriResolvers(Configuration config) {
        config["myResolver"] = config.build(MyResolver#)
    }

    @Contribute { serviceType=GlobalCommands# }
    Void contributeGlobalCommands(Configuration config) {
        config["cmdLaunchNukes"] = config.build(LaunchNukesCommand#)
    }

    @Contribute { serviceId="afReflux.menuBar" }
    Void contributeMenuBar(Configuration config, Reflux reflux) {
        menu := Menu() { it.text = "Example"}
        config
            .set("example", menu)
            .after("afReflux.editMenu")
            .before("afReflux.viewMenu")
        menu.add(MenuItem(Command("Monica",  null) { reflux.load("example:Monica" ) } ))
        menu.add(MenuItem(Command("Erica",   null) { reflux.load("example:Erica"  ) } ))
        menu.add(MenuItem(Command("Rita",    null) { reflux.load("example:Rita"   ) } ))
        menu.add(MenuItem(Command("Tina",    null) { reflux.load("example:Tina"   ) } ))
        menu.add(MenuItem(Command("Sandra",  null) { reflux.load("example:Sandra" ) } ))
        menu.add(MenuItem(Command("Mary",    null) { reflux.load("example:Mary"   ) } ))
        menu.add(MenuItem(Command("Jessica", null) { reflux.load("example:Jessica") } ))
    }

    @Contribute { serviceId="afReflux.editMenu" }
    Void contributeEditMenu(Configuration config, GlobalCommands globalCmds) {
        config["cmdLaunchNukes"] = MenuItem(globalCmds["cmdLaunchNukes"].command)
    }

    @Contribute { serviceId="afReflux.toolBar" }
    Void contributeToolBar(Configuration config, GlobalCommands globalCmds) {
        button := Button(globalCmds["cmdLaunchNukes"].command)
        button.text = ""
        config["cmdLaunchNukes"] = button
    }
}

class LaunchNukesCommand : GlobalCommand {
    new make(|This|in) : super.make("cmdLaunchNukes", in) {
        command.icon = Image(`fan://icons/x16/sun.png`)
    }

    override Void doInvoke(Event? event) {
        Dialog.openWarn(command.window, "Launching Nukes!")
    }
}

** This panel lists all the events it receives
class EventsPanel : Panel, RefluxEvents {
    Table table
    EventsPanelModel model := EventsPanelModel()

    new make(|This| in) : super(in) {
        icon = Image(`fan://icons/x16/history.png`)
        table = content = Table()
        table.model = model
    }

    override Void onLoadSession (Str:Obj? session) { update("onLoadSession"      ) }
    override Void onSaveSession (Str:Obj? session) { update("onSaveSession"      ) }
    override Void onLoad       (Resource resource) { update("onLoad"             ) }
    override Void onError            (Error error) { update("onError"            ) }
    override Void onPanelShown       (Panel panel) { update("onPanelShown"       , panel) }
    override Void onPanelHidden      (Panel panel) { update("onPanelHidden"      , panel) }
    override Void onPanelActivated   (Panel panel) { update("onPanelActivated"   , panel) }
    override Void onPanelDeactivated (Panel panel) { update("onPanelDeactivated" , panel) }
    override Void onPanelModified    (Panel panel) { update("onPanelModified"    , panel) }
    override Void onViewShown          (View view) { update("onViewShown"        , view) }
    override Void onViewHidden         (View view) { update("onViewHidden"       , view) }
    override Void onViewActivated      (View view) { update("onViewActivated"    , view) }
    override Void onViewDeactivated    (View view) { update("onViewDeactivated"  , view) }
    override Void onViewModified       (View view) { update("onViewModified"     , view) }

    Void update(Str event, Obj? panel := null) {
        model.events.add([event, panel?.typeof?.name ?: ""])
        //Err("$event + ${panel?.typeof?.name}").trace
        table.refreshAll
    }
}
class EventsPanelModel : TableModel {
    Str[][] events := Str[][,]
    override Int numCols() { 2 }
    override Int numRows() { events.size }
    override Str header(Int col) { col == 0 ? "Events" : "Panel" }
    override Str text(Int col, Int row) { events[row][col] }
}

** This panel, when active, enables the global cmdLaunchNukes command
class AlienAlertPanel : Panel {
    @Inject GlobalCommands globalCommands

    new make(|This| in) : super(in) {
        icon = Image(`fan://icons/x16/warn.png`)
        name = "Alien Alert!"
        content = Text() {
            it.bg = Color.red
            it.multiLine = true
            it.text = "Alien Alert!\n
                       Aliens are attacking!\nLaunch the Nukes!\n
                       Tip: Select the other tab first."
        }
    }

    override Void onActivate() {
        globalCommands["cmdLaunchNukes"].removeEnabler("alienAlert")
    }

    override Void onDeactivate() {
        // only enable the nuke when we *aren't* active!
        globalCommands["cmdLaunchNukes"].addEnabler("alienAlert") |->Bool| { true }
    }
}

class MyResolver : UriResolver {
    @Inject Registry registry

    new make(|This|in) { in(this) }

    override Resource? resolve(Str uri) {
        uri.toUri.scheme == "example"
            ? MyResource(uri.toUri)
            : null
    }
}

class MyResource : Resource {
    override Uri     uri
    override Str     name
    override Image?  icon

    new make(Uri uri) {
        this.uri  = uri
        this.name = uri.name
        this.icon = Image(`fan://icons/x16/database.png`)
    }

    override Type[] viewTypes() {
        [MyView#]
    }
}

class MyView : View {
    Label label

    new make(|This| in) : super(in) {
        content = label = Label() {
            it.bg   = Color.green
        }
    }

    override Void load(Resource resource) {
        super.load(resource)
        label.text = "Resource Name: ${resource.name}"
    }
}
Javascript
Reflux is also available in Javascript, meaning it runs in an Internet Browser! Here's the above sample application:
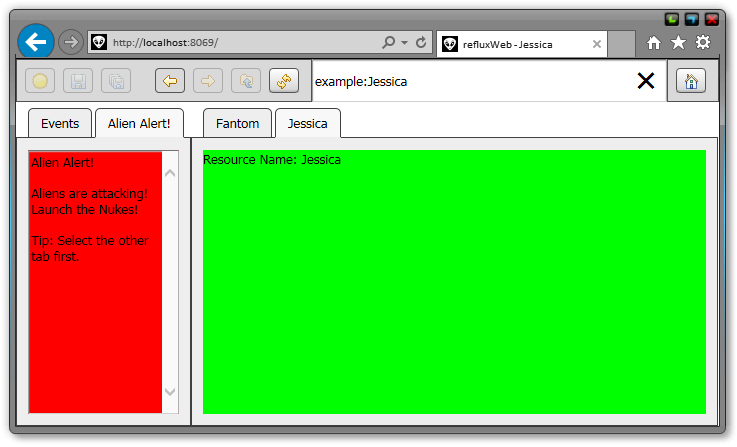
As great as it is, there are some known limitations, mostly around the limited FWT support in Javascript. Some of these include:
- Menu Bars aren't available.
- Right click context menu's are available.
- Tabs don't have close buttons.
- Custom Event classes aren't dynamically compiled.
Still, it's a fantastic and easy way to kick start your web applications!
BedSheet
For a Reflux application to run in a browser, it first needs to be served up by a web server. The easiest way to do this is with a BedSheet application, using Duvet to inject your Reflux application into a web page.
A simple bed app that does that is given below:
build.fan
using build

class Build : BuildPod {
    new make() {
        podName = "refluxWebApp"
        summary = "Reflux Web Application"
        version = Version("0.0.1")

        depends = [
            "sys        1.0.68 - 1.0",
            "gfx        1.0.68 - 1.0",
            "fwt        1.0.68 - 1.0",

            // ---- Core ------------------------
            "afIoc      3.0.0  - 3.0",
            "afReflux   0.1.0  - 1.0",

            // ---- Web -------------------------
            "afBedSheet 1.5.0  - 1.5",
            "afDuvet    1.1.0  - 1.1",
            "afColdFeet 1.4.0  - 1.4"
        ]

        srcDirs = [`fan/`]
    }
}
fan/Main.fan
using afIoc::Contribute
using afIoc::Configuration
using afIoc::Inject
using afBedSheet
using afReflux::RefluxModule
using afDuvet::HtmlInjector

class Main {
    Void main() {
        BedSheetBuilder("refluxWeb")
            .removeModule(RefluxModule#)
            .startWisp(8069, true)
    }
}


const class AppModule {
    @Contribute { serviceType=Routes# }
    Void contributeRoutes(Configuration config) {
        config.add(Route(`/`, IndexPage#html))
    }
}


const class IndexPage {
    @Inject private const HtmlInjector htmlInjector

    new make(|This|in) { in(this) }

    Text html() {
        // inject the main method of your Reflux application here
        htmlInjector.injectFantomMethod(Example#main)

        return Text.fromHtml(
            "<!DOCTYPE html>
             <html>
             <head>
                 <title>Reflux - On a WebPage!</title>
             </head>
             <body>
             </body>
             </html>")
    }
}
Just substitute the above Example#main with the main method of your Reflux application. The Reflux application may be in the same, or a different pod.
Oh, and don't forget to annotate the classes in your Reflux application with @Js!
Have fun!